
The Docker Datacenter: Agile Application Development for Enterprise DevOps
December 19, 2016
Docker’s Datacenter offering makes it easy for enterprises to set up their own internal containers-as-a-service (CaaS) environments. Put simply, the new package helps to integrate Docker into enterprise software delivery processes.
Available as a subscription, the Docker Datacenter (DDC) provides a way for organizations to let their developers deploy their applications easily without worrying about issues that might arise from moving a codebase from development into production.
More on the subject:
The CaaS platform provides the container and cluster orchestration. With cloud templates, pre-built for the DDC, developers and IT operations staff can move Dockerized applications not only into clouds but also into and out of their premises.
The DDC includes the Docker Universal Control Plane (UCP), the Docker Trusted Registry (DTR), and the Commercially Supported (CS) Docker Engine.
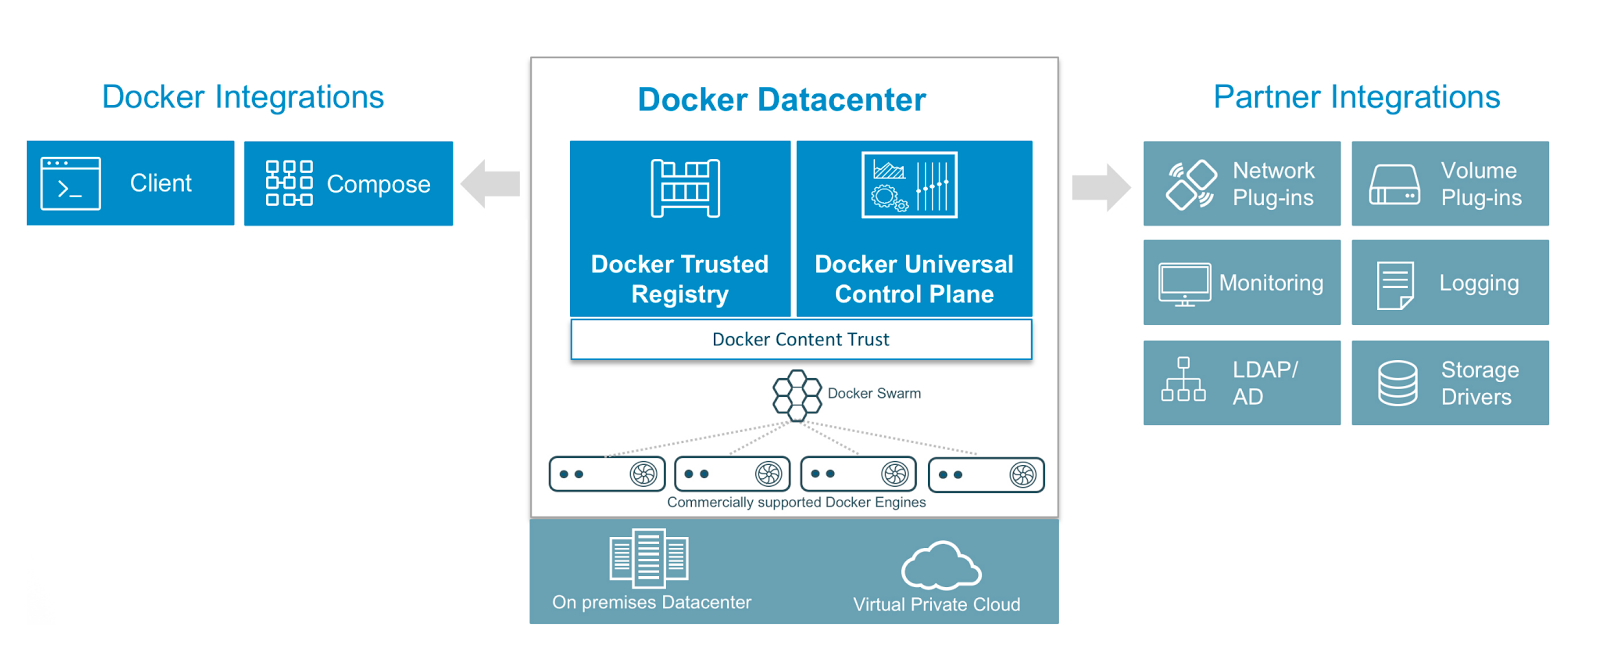
The Universal Control Plane
The UCP is a cluster management solution that can be installed on-premise or on a virtual private cloud. The UCP exposes the standard Docker API so that you can continue to use the tools that you already know to manage an entire cluster. As an example, you can still use the command docker info to check the status of the cluster:
Containers: 15
Images: 10
Server Version: swarm/1.1.3
Role: primary
Strategy: spread
Filters: health, port, dependency, affinity, constraint
Nodes: 2
 ucp: :
   └ Status: Healthy
   └ Containers: 20
 ucp-replica: :
   └ Status: Healthy
   └ Containers: 10
The UCP_IP and PORT are the IP and the port of the cluster nodes. With the Docker UCP, you can still manage the nodes of your infrastructure as apps, containers, networks, images, and volumes. The Docker UCP has its own built-in authentication mechanism, and it supports LDAP and Active Directory as well as role-based access control (RBAC). This ensures that only authorized users can access and make changes to the cluster.
The UCP is a containerized application that allows you to manage a set of nodes that are part of the same Docker Swarm. The core component of the UCP is a globally-scheduled service called ucp-agent. Once this service is running, it deploys containers with other UCP components and ensures that they continue to run.
The Docker Trusted Registry
Docker security is one of the biggest challenges that developers face when it comes to enterprise adoption of Docker. Recognizing this challenge and the enterprise’s need to continue streamlining security across its whole network, Docker introduced the Docker Trusted Registry (DTR).
The DTR uses the same authentication mechanism as the Docker UCP. It has a built-in authentication mechanism and integrates with LDAP and Active Directory. It also supports RBAC. This allows you to implement individualized access control policies as necessary.
Docker Datacenter Deployment: Step-by-Step
There are mainly two options to run DDC. You can deploy the whole stack — including UCP and DTR — using AWS CloudFormation templates on top of Amazon or manually on top of your Linux servers. However, in our case, we will use the second option with the Docker CaaS (container as a service) offering. The CaaS option is basically a hosted SaaS solution where the Docker engine, UCP, and DTR are operated by Docker and the container nodes run on our servers. In this example, we will link to our AWS environment. However, note that these can run in your on-premise environment as well.
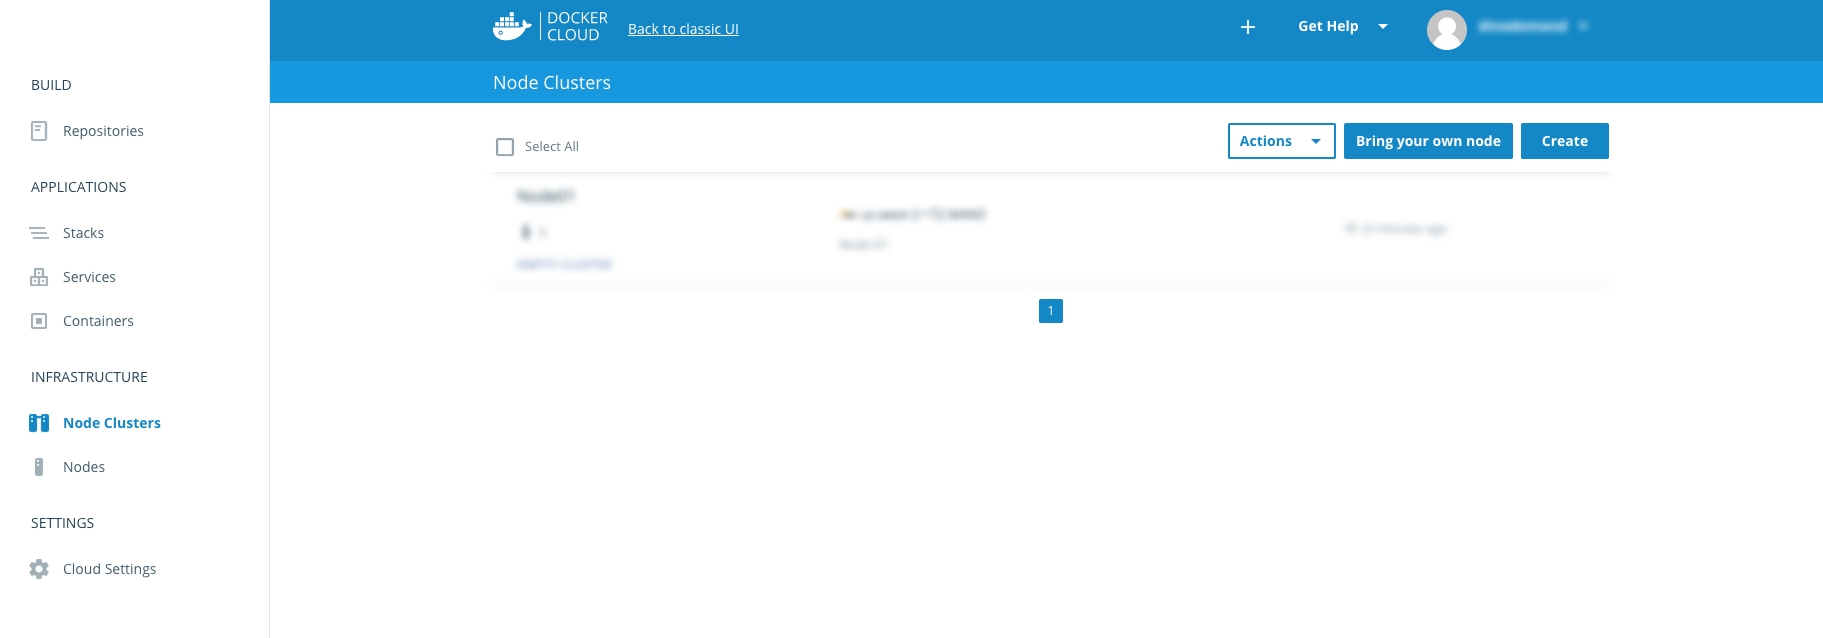
Deploy Node Clusters on Amazon Cloud
Log in to your DDC account (you can register for the trial Docker Datacenter version to try it), and look for the Cloud Settings option on the left menu. As shown below, you will see the Cloud providers option. This contains the list of supported public cloud providers with which you can connect. The cloud providers are there for creating and hosting the nodes, which are managed through the Docker Datacenter.
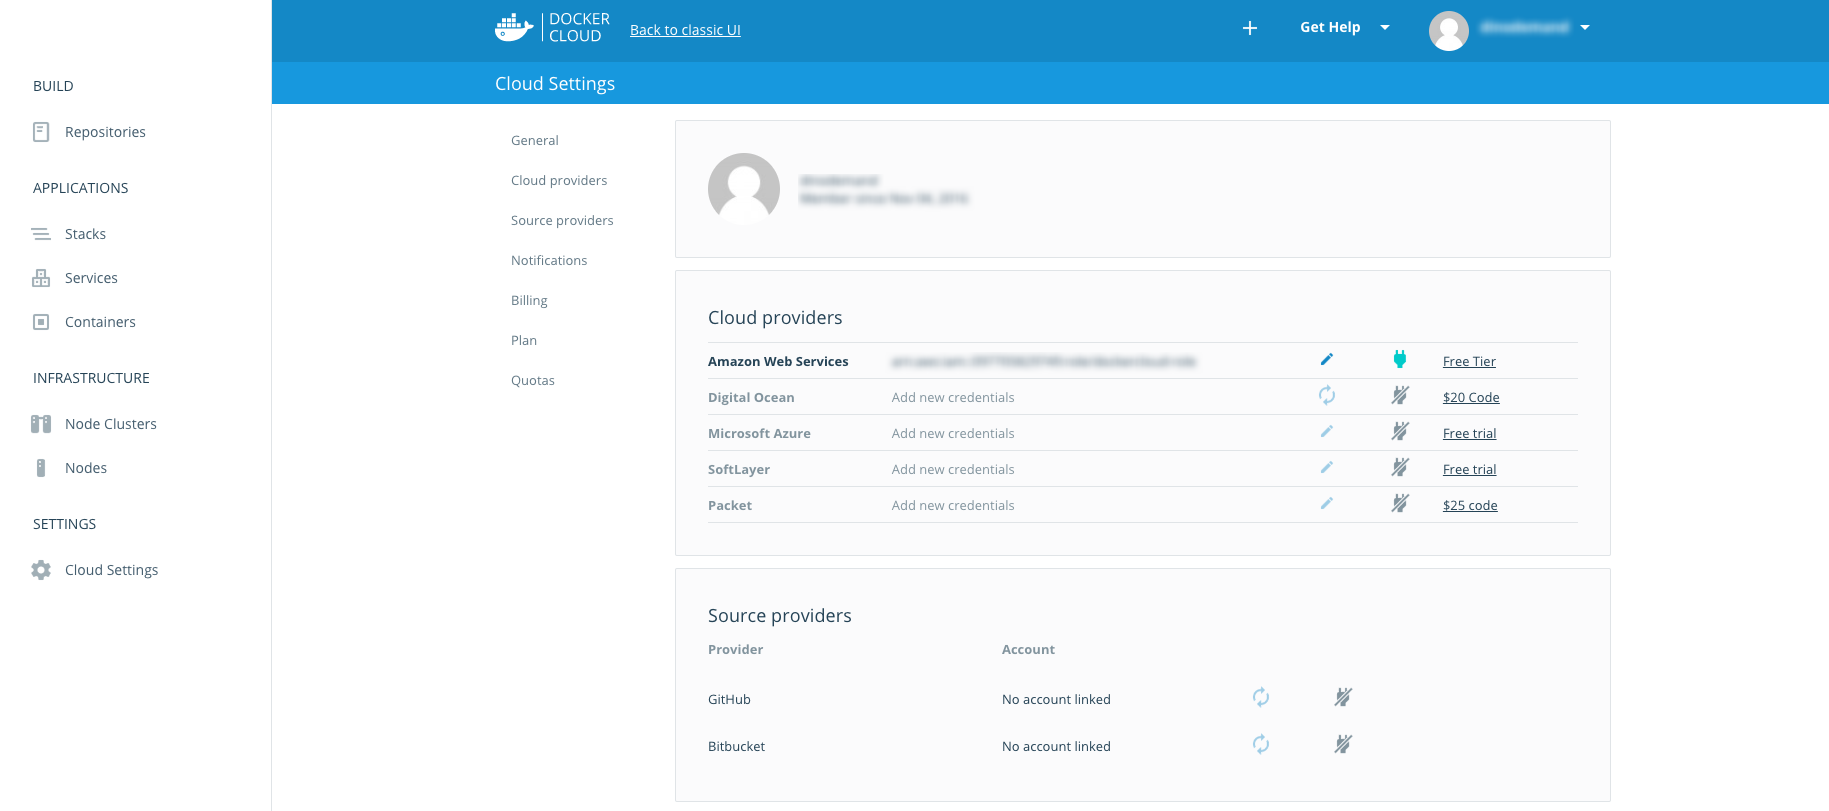
We will select AWS as our cloud provider. After clicking on the Plug-and-Play icon, you will see the dialog box with the input text field. This requires the role delegation ARN to be entered.
Node Cluster Setup
Once you are connected to your AWS environment, you’re now ready to set up the infrastructure. The infrastructure can be configured using the items under the Infrastructure section, as shown below:
After clicking the Create button, you will be redirected to the configuration page — where you will be asked to enter the configuration parameters for your cluster:
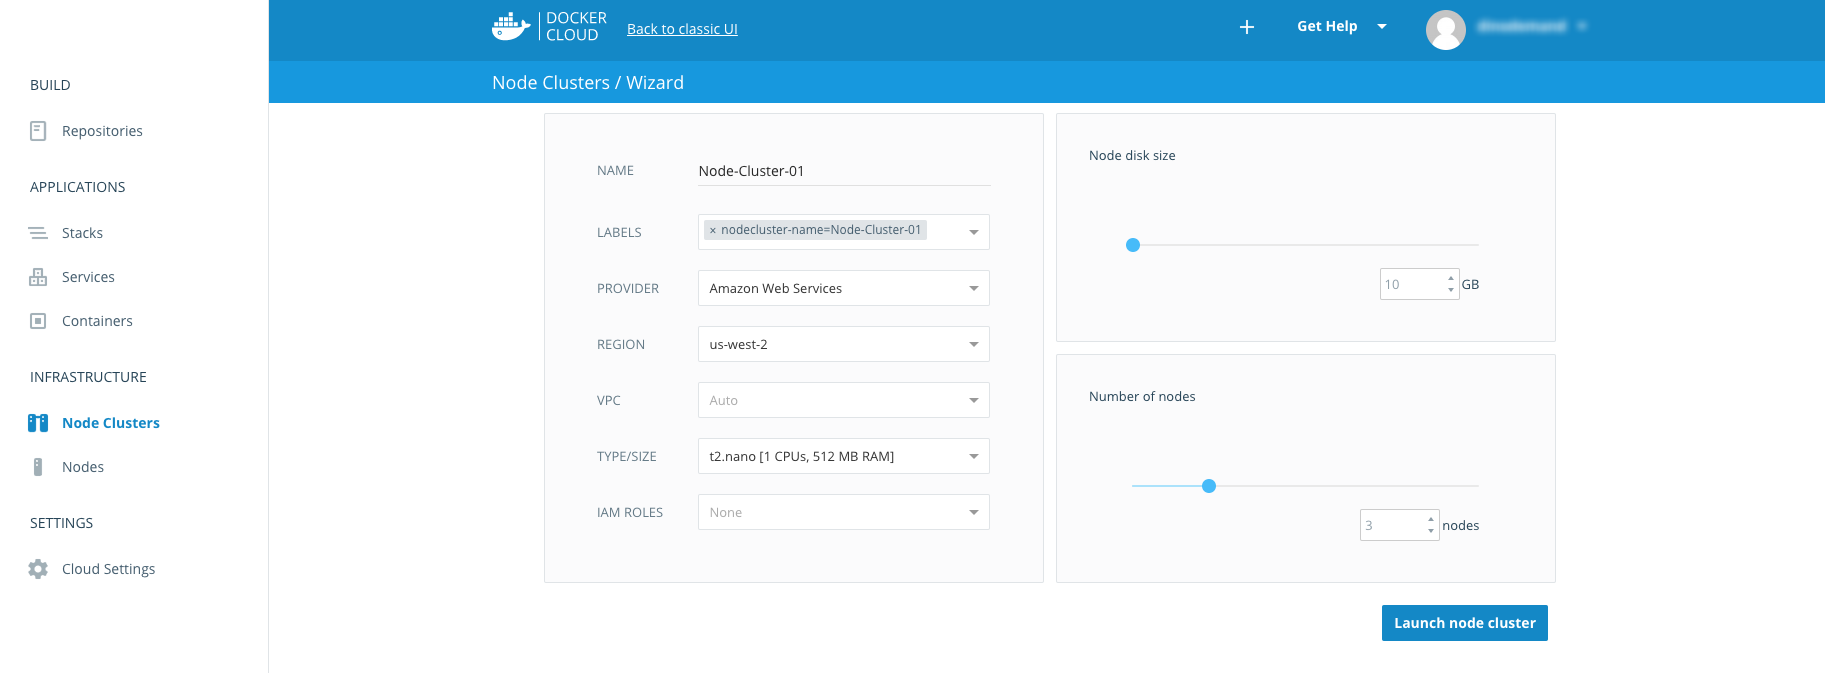
The cluster name has no restrictions. This also applies to the Labels field, which allows you to provide additional descriptions about the cluster that you want to create.
The Suggestions list also appears shortly after clicking on this field. As the provider, you have to select the one that you have linked with your account. The field itself requires only one choice, and you are not restricted to creating node clusters that are hosted on different providers.
Continue with selecting your AWS region and the network (i.e., VPC). If you leave the VPC default as “auto,” all of the cluster’s nodes will be deployed under a new, automatically-created VPC.
The type/size field is used for configuring the number of CPUs and RAM per node. The IAM role can be untouched and left with the default value of “none.” The last two fields left to configure are the disk size and number of nodes that we want to put in the cluster. In our case, we set 10 GB for disk space, and three nodes to be created.
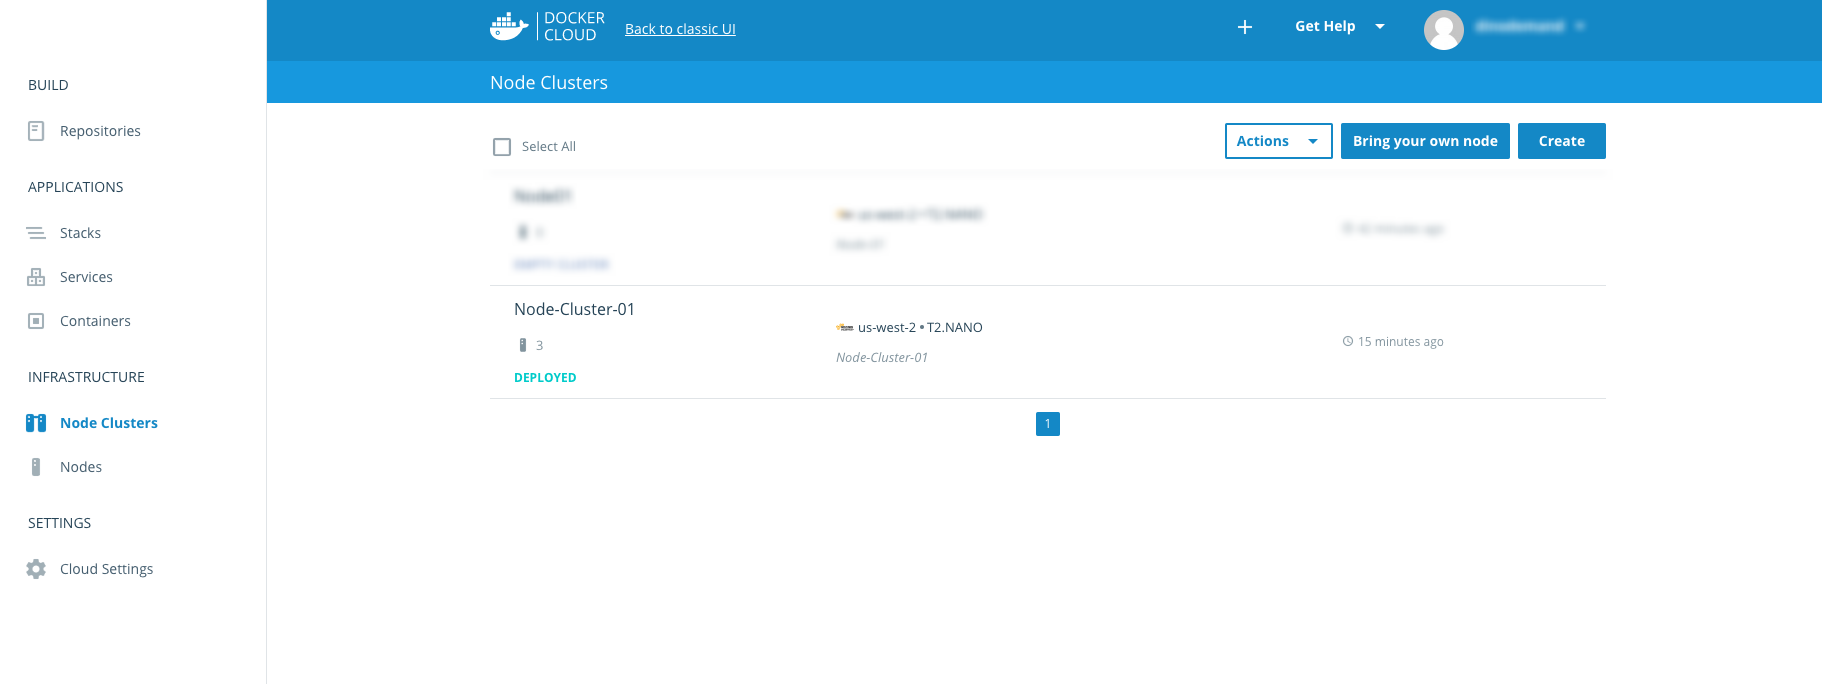
Now, click Launch node cluster. After a few seconds, this will be redirected to the Node Clusters overview page — where you will be able to track the status of your cluster. After node clusters have been deployed successfully, the status Deployed will be present just below the name of the node clusters.
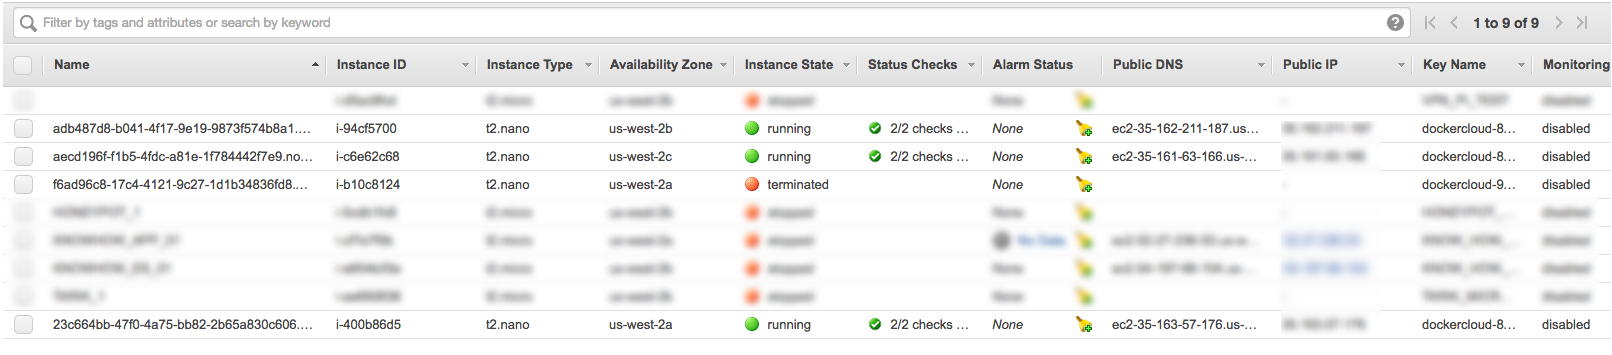
Right after clicking the Launch Node cluster button, you will be able to see changes for your cloud provider (in our case, AWS). This is because the Docker Datacenter is linked with your cloud platform, and all nodes that are created are hosted there. You will be able to monitor them using supported ways of monitoring on your cloud platform. (See the Logz.io Docker Log Collector for one way to centralize and monitor Docker environments.)
Deploying a Service Across Node Clusters
We will now detail how to deploy a service across node clusters. In our case, this will be NGINX, using the images available on Docker Hub.
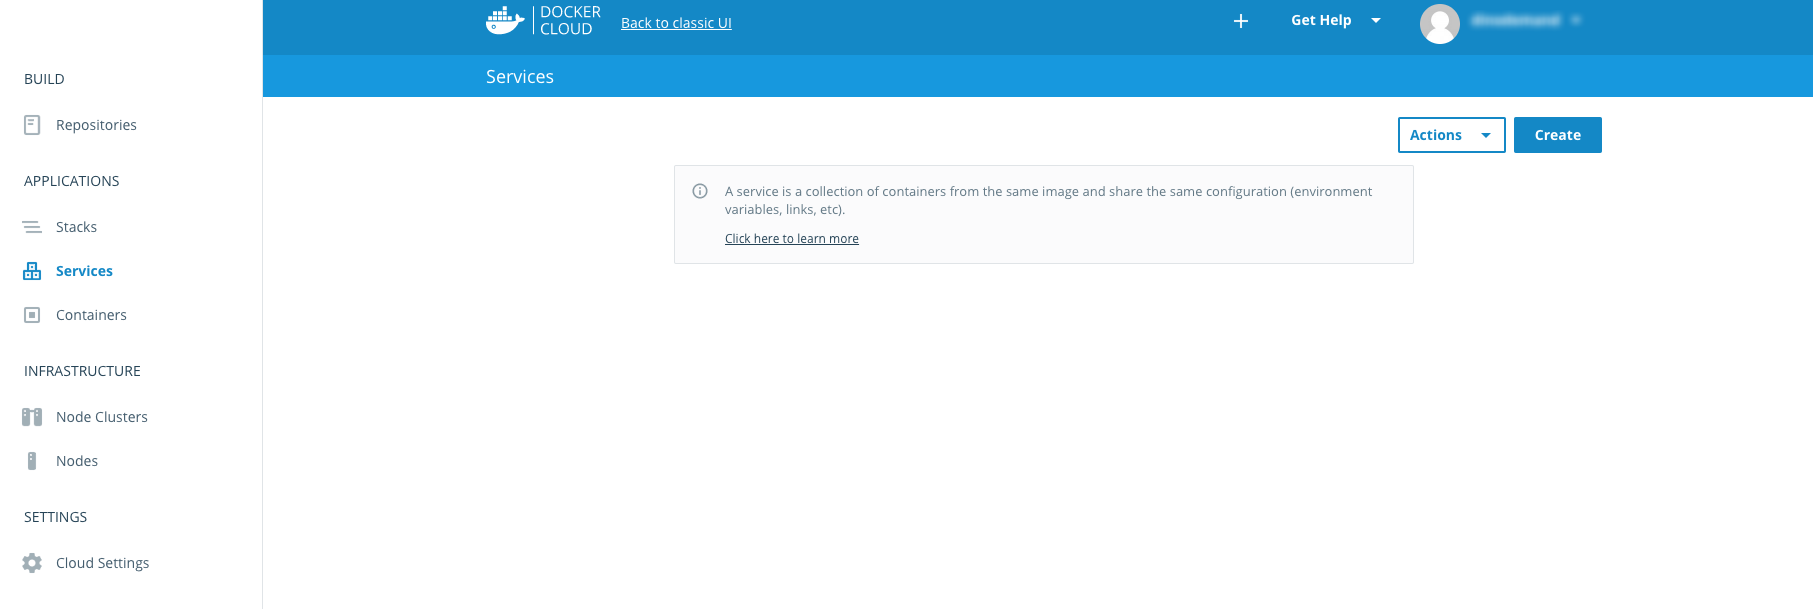
On the left menu, click Services, which will display the service panel in the main view. Then click the Create button in the top right corner. You will be redirected to where you can select the way to get images for your deployment.
In addition to the Jumpstarts section and public images, there’s also a section where you can define your own repository from which you want to pull the images. We will use the publicly available images.
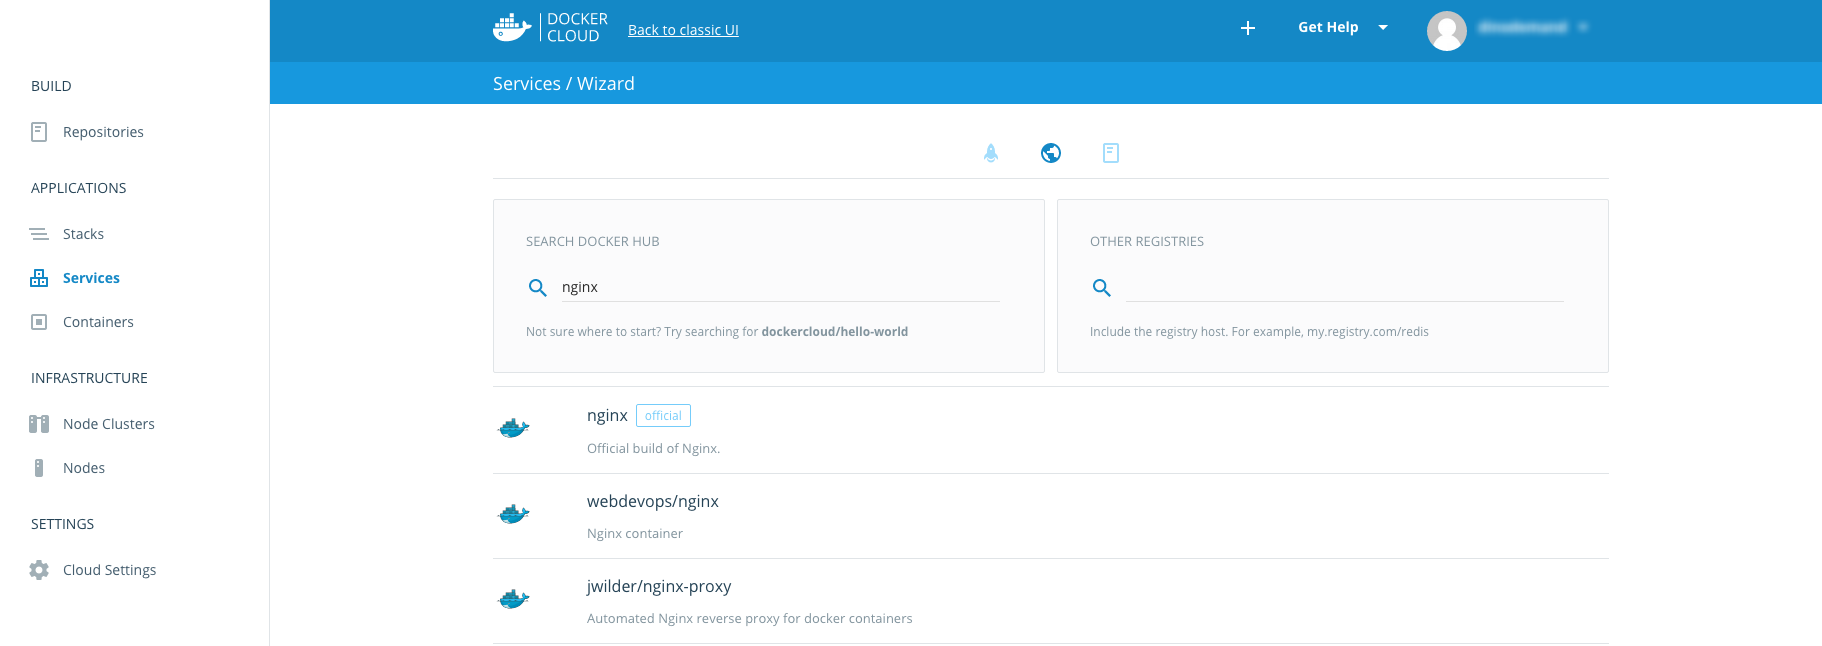
Type “NGINX” inside the textbox inside the Search Docker Hub section, and press “Enter.” You will then see the list of available images that match the term “NGINX.” Select the official one, which is located at the first item in the list.
After clicking the “Select” button inside the list item, you will be redirected to the Settings page. One of the most important settings here is the deployment strategy. This is important for the following things:
- Balancing the load across nodes
- Setting the options for auto-restart and auto-destroy for what you want to occur when containers crash unexpectedly
- Determining the policy for terminating containers when they stop (note that this action actually destroys all data in the containers upon termination)
- Deciding the auto-redeploy option for automatically redeploying a service when new images are pushed or built
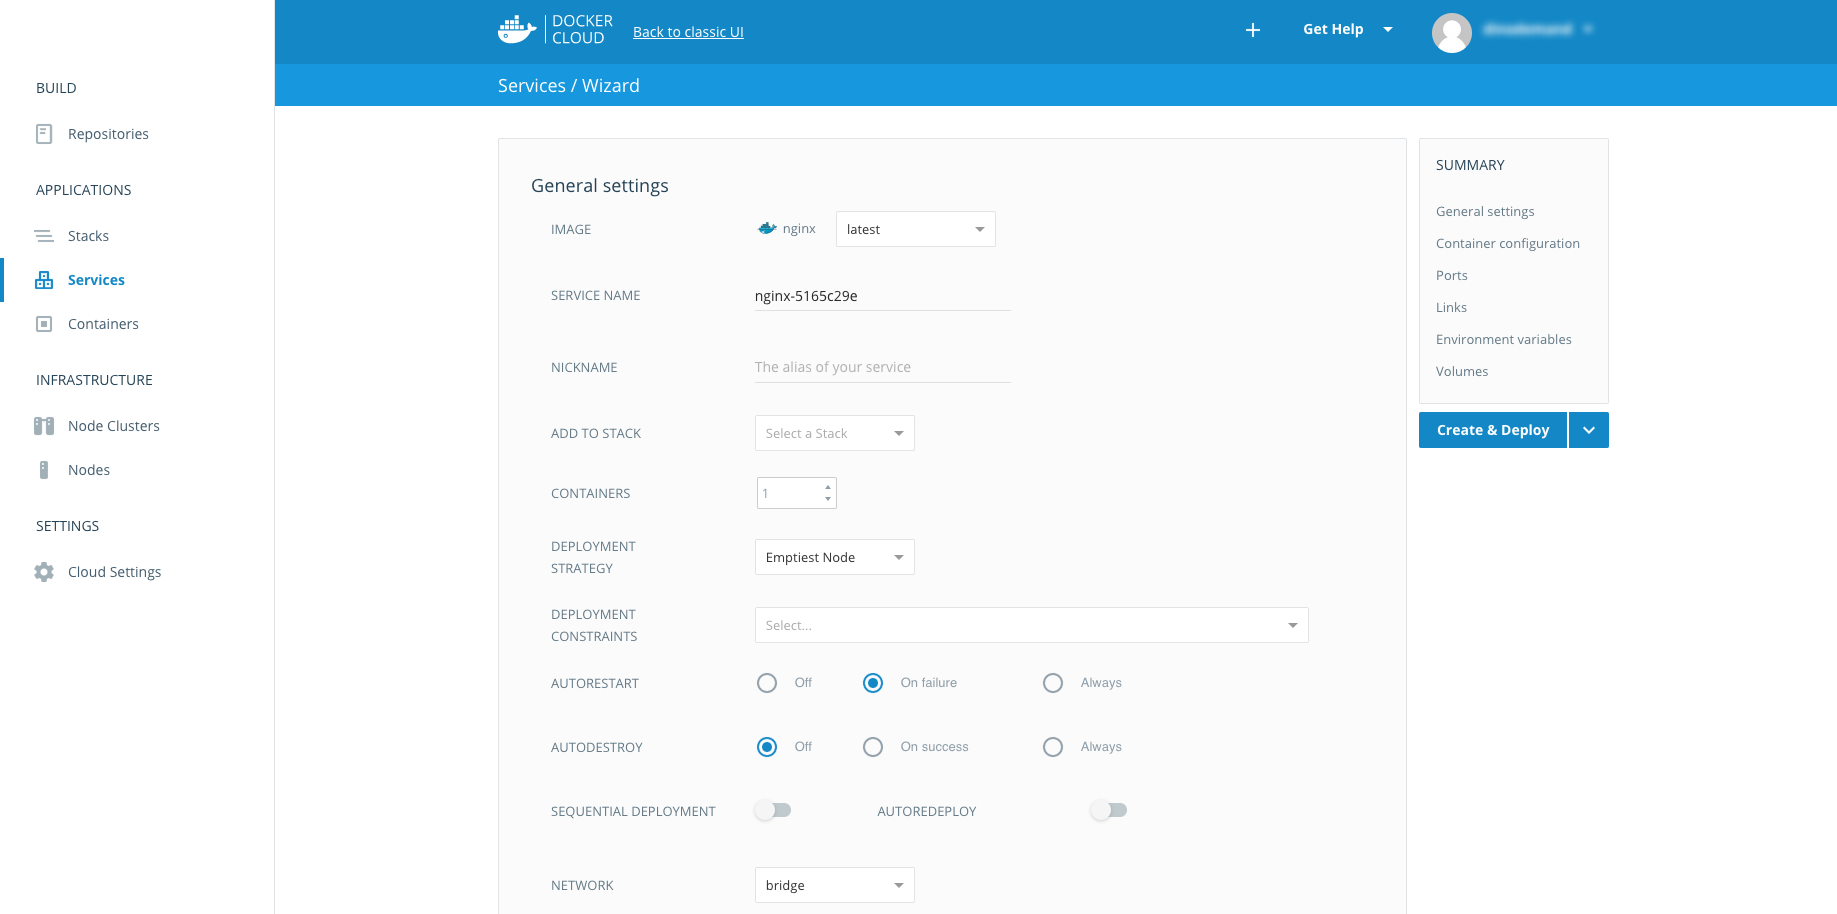
The other panels are related to entry point additions, run commands, memory limits, and CPU limits. In this case, we do not have to change anything, so we will leave the default values as they are.
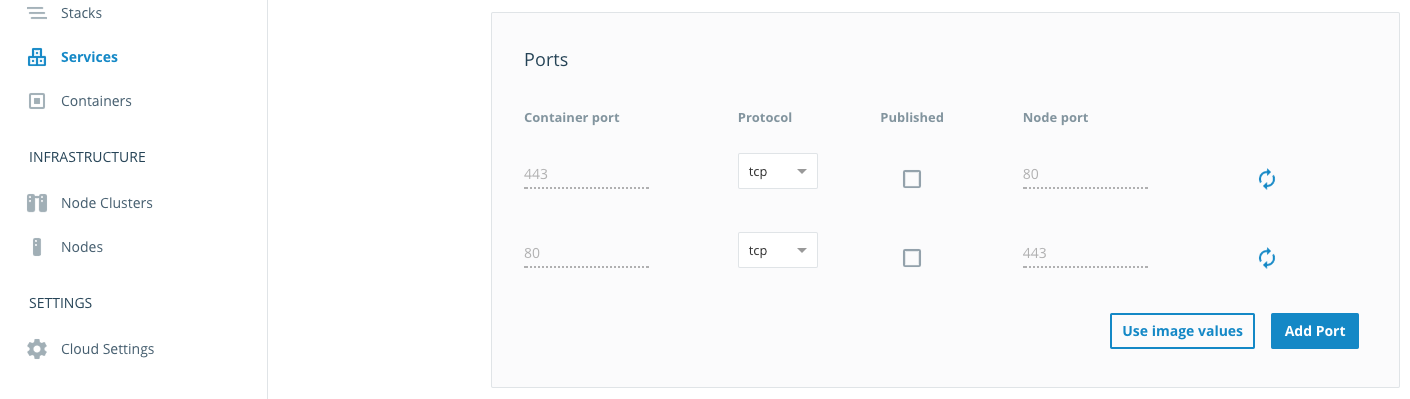
The next section is the Ports section, which is where we can select which ports are published and available to the outside world (as well as which ones are not publicly accessible). In our case, we will publish ports 80 and 443.
The next sections are for configuring the environment variables, volumes, and links on other services. The links are useful, for example, when you have deployed an API service as a separate service and your NGINX server is there to redirect requests to the API services.
When our configuration is done, we can click the “Create & Deploy” button, which will redirect you to the Service Overview page. There, you can see the deployment status, the overview of your configuration that you entered in the previous step, the containers, the triggers for scaling, the links, the volumes, the environment variables, and the endpoints that contain the DNS for accessing the NGINX server.

If you click one of the links presented in the Endpoints section, you will see the NGINX welcome page.
More on the subject:
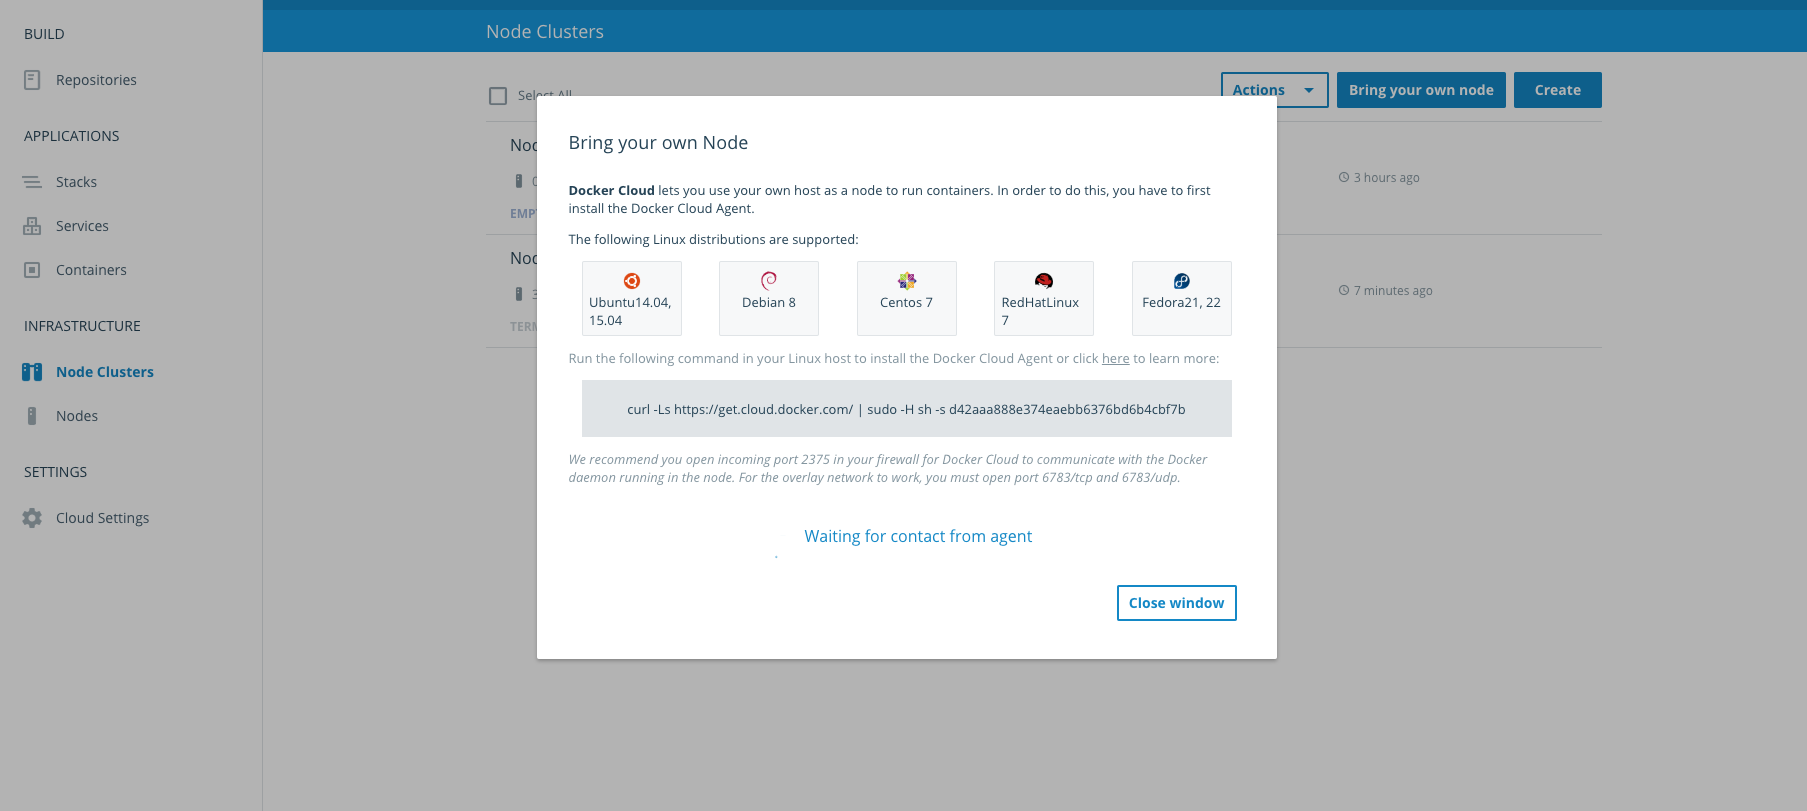
As mentioned, in addition to connecting with your AWS account, you can also bring your own on-premise nodes. No matter where they are, you simply need to install supported operating systems. These are listed right after clicking the “Bring your own node” button in the Node Clusters section and typing the command (provided inside the modal window) inside the servers that are dedicated to act like a node inside the Datacenter.
In Summary
In this post, we have described how the Docker Datacenter can be used to work together with existing cloud platforms. We have also shown how the Datacenter is a robust, comprehensive platform that deserves attention for the efficiency that it brings to the DevOps world. Minimal time and effort are needed to install, configure, and upgrade whatever architecture is required for your services, and the Web UI can be managed in just a few clicks.
The Docker Datacenter also supports the Docker API, which is embedded in Docker Engine and Docker Swarm — where developers of existing services do not need to code or change anything. In addition to all of these features, the Datacenter also has built-in high availability and security features that keep the application pipeline flowing.

You Might Also Like
Tips and Tricks for the Small SOC:
The Open 360 AI Experience

