
AWS ELB Log Analysis with the ELK Stack
March 28, 2017
Elastic Load Balancers (ELB) let AWS users distribute traffic across EC2 instances. ELB access logs are one option users have to monitor and troubleshoot that traffic. ELB access logs are collections of information on all the traffic running through the load balancers. This data includes ELB access logs, accessed machines, requester identity (OS, browser, etc.), processing time, and traffic volume.
Here is an example of an ELB access log:
2017-03-09T21:59:57.543344Z production-site-lb 54.182.214.11:6658 172.31.62.236:80 0.000049 0.268097 0.000041 200 200 0 20996 "GET https://logz.io:80/blog/kibana-visualizations/ HTTP/1.1" "Amazon CloudFront"
ELB logs come in handy for a variety of use cases — monitoring access logs, checking the operational health of the ELBs, and measuring their efficient operation, to name a few. In the context of operational health, you might want to determine if your traffic is being equally distributed among all internal servers. For operational efficiency, you might want to identify the volumes of access that you are getting from different locations in the world.
AWS allows you to ship ELB logs into an S3 bucket, and from there you can ingest them using any platform you choose. This article describes how to use the ELK Stack (Elasticsearch, Logstash and Kibana) to index, parse, and visualize the data that your ELB instances log.
Enabling ELB Logging
By default, ELB logging is inactive, so your first step is to enable logging.
Before you do so, you will need to create a bucket in S3 and make sure it has the correct policy, as the AWS documentation describes:
{
 "Id": "Policy1489048269282",
 "Version": "2012-10-17",
 "Statement": [
  {
  "Sid": "Stmt1489048264236",
  "Action": [
  "s3:PutObject"
 ],
 "Effect": "Allow",
 "Resource": "arn:aws:s3:::daniel-elb/AWSLogs/011173820421/*",
 "Principal": {
  "AWS": [
   "127311923021"
  ]
 }
}
]
}
Then, in the EC2 console, open the Load Balancers page and select your load balancer from the list.
In the Description tab below, scroll down to the Attributes section and click the “edit” button. In the dialog that pops up, enable access logs and then enter the name of the S3 bucket to which you want to ship the logs:

If the logging pipeline is setup correctly, you should see a test log file in the bucket after a few minutes. The access logs themselves take a while longer to be sent into the bucket.
Shipping into ELK
Once in S3, there are a number of ways to get the data into the ELK Stack.
More on the subject:
If you are using Logz.io, you can ingest the data directly from the S3 bucket. Parsing will then apply itself automatically before Elasticsearch indexes the data. If you are using your own ELK deployment, Logstash can use different shipping methods to pull and enhance the logs.
Let’s take a look at these two methods.
Using Logz.io
All you have to do to ship thee ELB logs from an S3 bucket into Logz.io is configure the S3 where you plan to store the logs. Before you do so, make sure the bucket has the correct ListBucket and GetObject policies as described here.
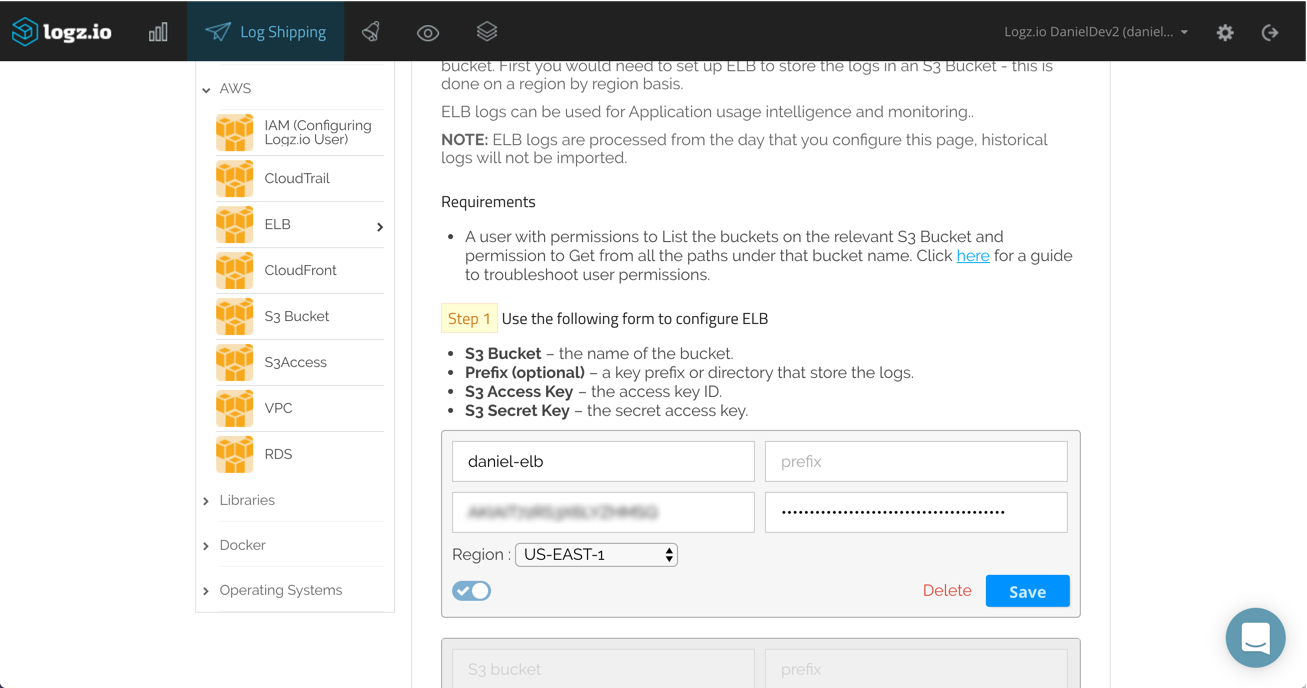
Under Log Shipping, open the AWS → ELB tab. Enter the name of the S3 bucket together with the IAM user credentials (access key and secret key). Select the AWS region and click Save.
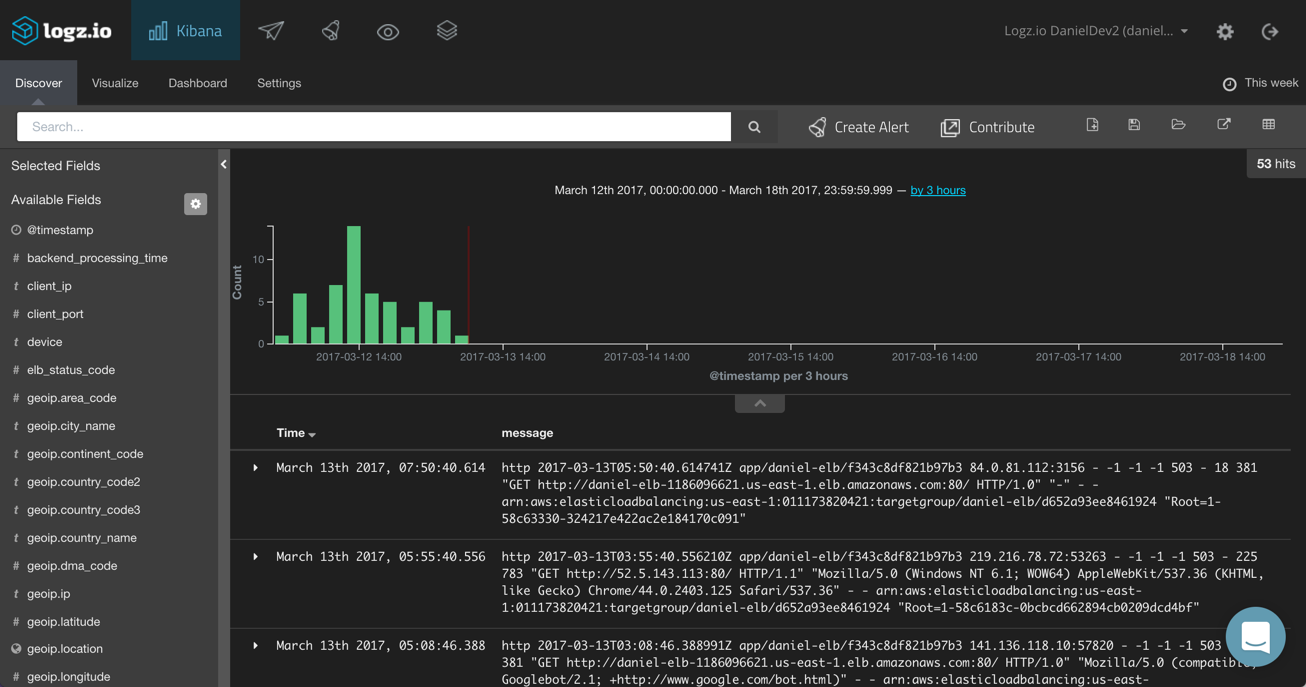
That’s all there is to it. Logz.io will identify the log type and automatically apply parsing to the logs. After a few seconds, the logs will be displayed in Kibana:
Using Logstash
As mentioned above, there are a number of ways to ship your ELB logs from the S3 bucket if you are using your own ELK deployment.
You can use the Logstash S3 input plugin or, alternatively, download the file and use the Logstash file input plugin. In the example below, I am using the latter, and in the filters section defined some grok patterns to have Logstash parse the ELB logs correctly. A local Elasticsearch instance is defined as the output:
input {
   file {
      path => "/pathtofile/*.log"
      type => "elb"
      start_position => "beginning"
      sincedb_path => "log_sincedb"
      }
}

filter {
   if [type] == "elb" {
      grok {
         match => ["message", "%{TIMESTAMP_ISO8601:timestamp} %{NOTSPACE:loadbalancer} %{IP:client_ip}:%{NUMBER:client_port:int} (?:%{IP:backend_ip}:%{NUMBER:backend_port:int}|-) %{NUMBER:request_processing_time:float} %{NUMBER:backend_processing_time:float} %{NUMBER:response_processing_time:float} (?:%{NUMBER:elb_status_code:int}|-) (?:%{NUMBER:backend_status_code:int}|-) %{NUMBER:received_bytes:int} %{NUMBER:sent_bytes:int} \"(?:%{WORD:verb}|-) (?:%{GREEDYDATA:request}|-) (?:HTTP/%{NUMBER:httpversion}|-( )?)\" \"%{DATA:userAgent}\"( %{NOTSPACE:ssl_cipher} %{NOTSPACE:ssl_protocol})?"]
      }

      grok {
         match => ["request", "%{URIPROTO:http_protocol}"]
      }

      if [request] != "-" {
         grok {
            match => ["request", "(?[^?]*)"]
            overwrite => ["request"]
         }
      }

      geoip {
         source => "client_ip"
         target => "geoip"
         add_tag => ["geoip"]
      }

      useragent {
         source => "userAgent"
      }

      date {
         match => ["timestamp", "ISO8601"]
      }
   }
}

output {
   elasticsearch { hosts => ["localhost:9200"] }
   stdout { codec => rubydebug }
}
Analyzing and Monitoring ELB Logs
Whatever method you used to pull the ELB logs from S3 into your ELK, the result is the same. You can now use Kibana to analyze the logs and create a dashboard to monitor traffic.
What should you be monitoring?
ELB logs are similar to web server logs. They contain data about each request your load balancer processes. Below are a few examples of which metrics or information that visualizations can monitors.
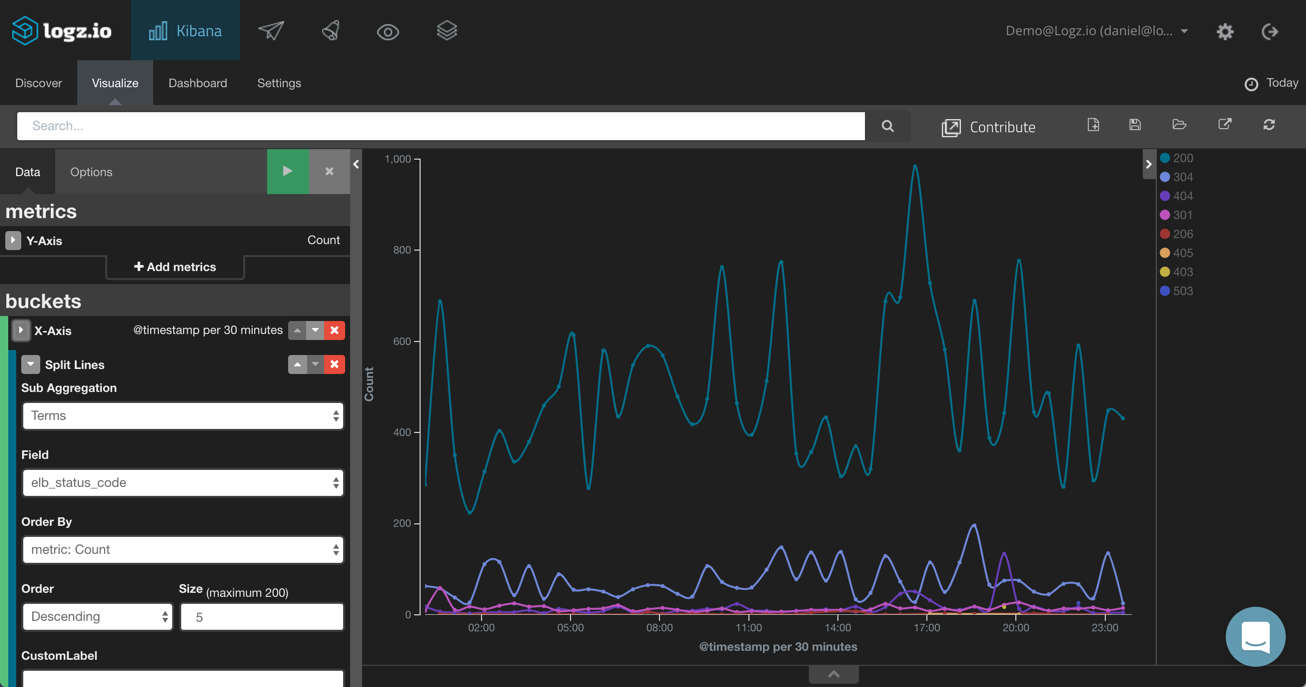
Response codes
A useful metric to monitor is the rate of error response codes the load balancer reports. To do this, I’m going to choose the Line Chart visualization. As our Y axis, we can leave the default Count aggregation. As the X axis, we are going to use both a date histogram and a split line using the elb_status_code field.
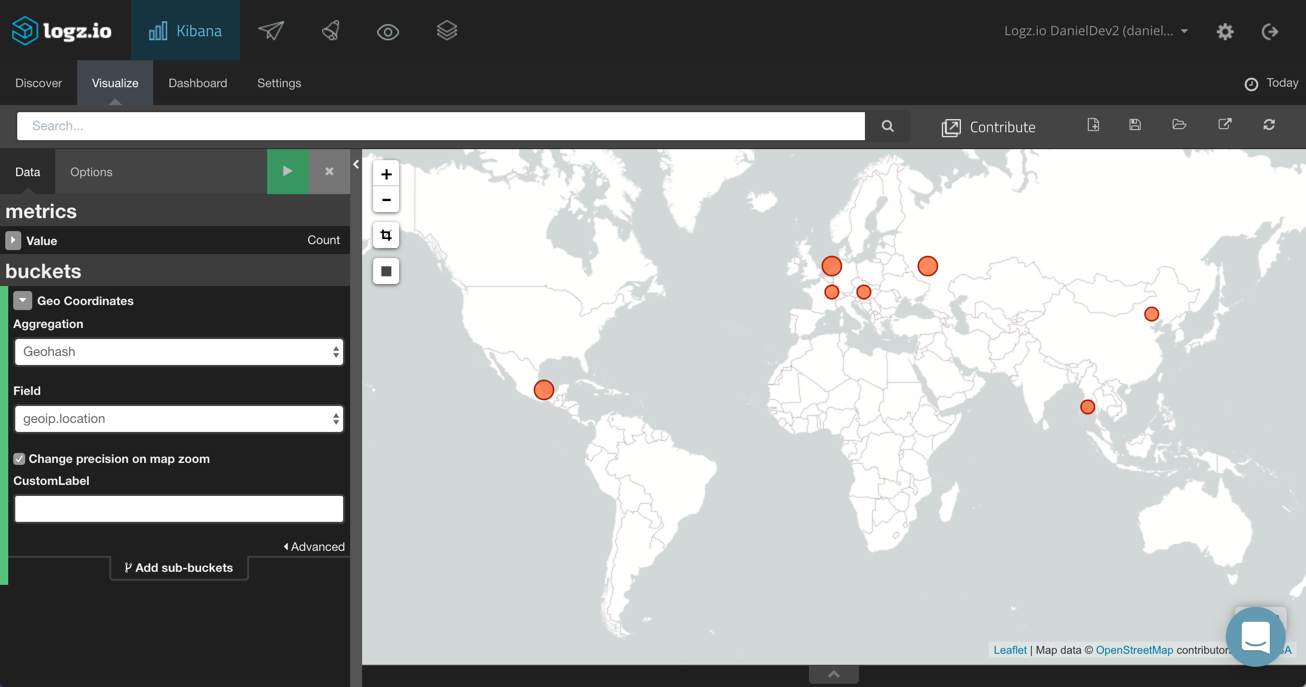
Geographic distribution of requests
We can see a geographical depiction of the clients sending the requests that out ELB instance is processing. To do this, we will choose the Tile map visualization and use the geoip.location field we added as part of our Logstash configuration.
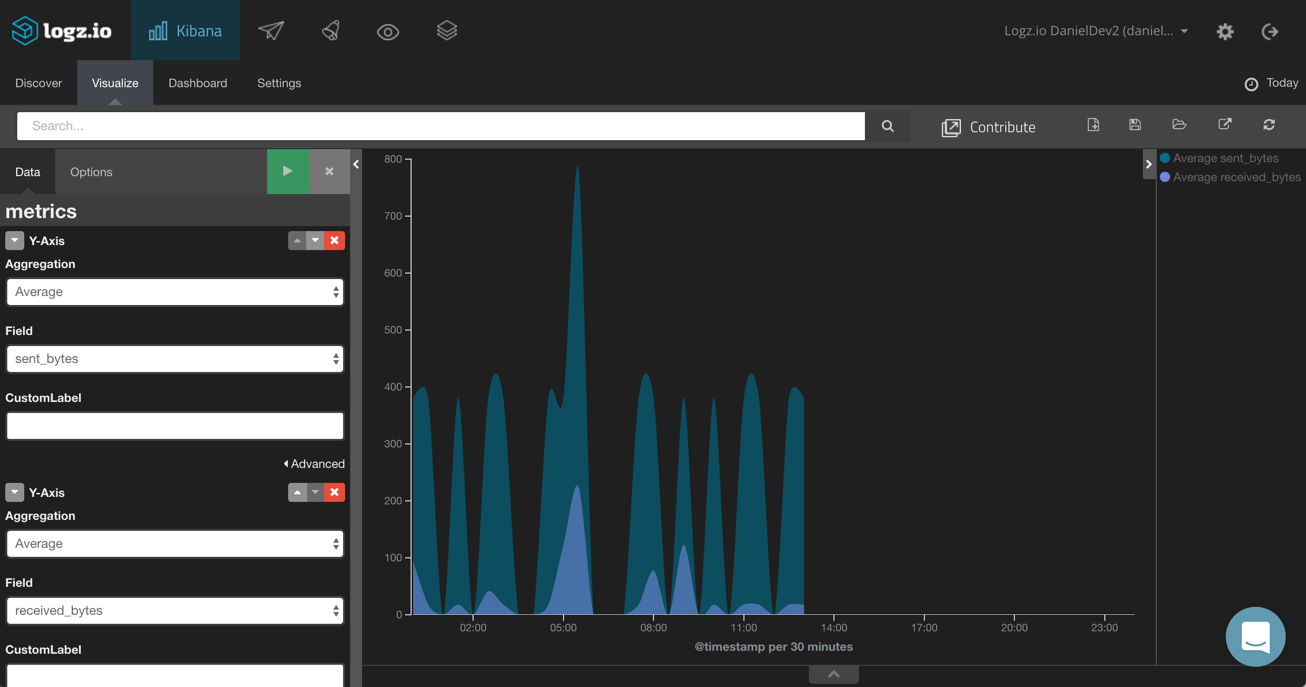
Sent vs. received bytes
Using an Area Chart visualization, we can get a good picture on the incoming versus outgoing traffic using the sent_bytes and received_bytes metrics. The X axis (not shown in the image below) is a time histogram.
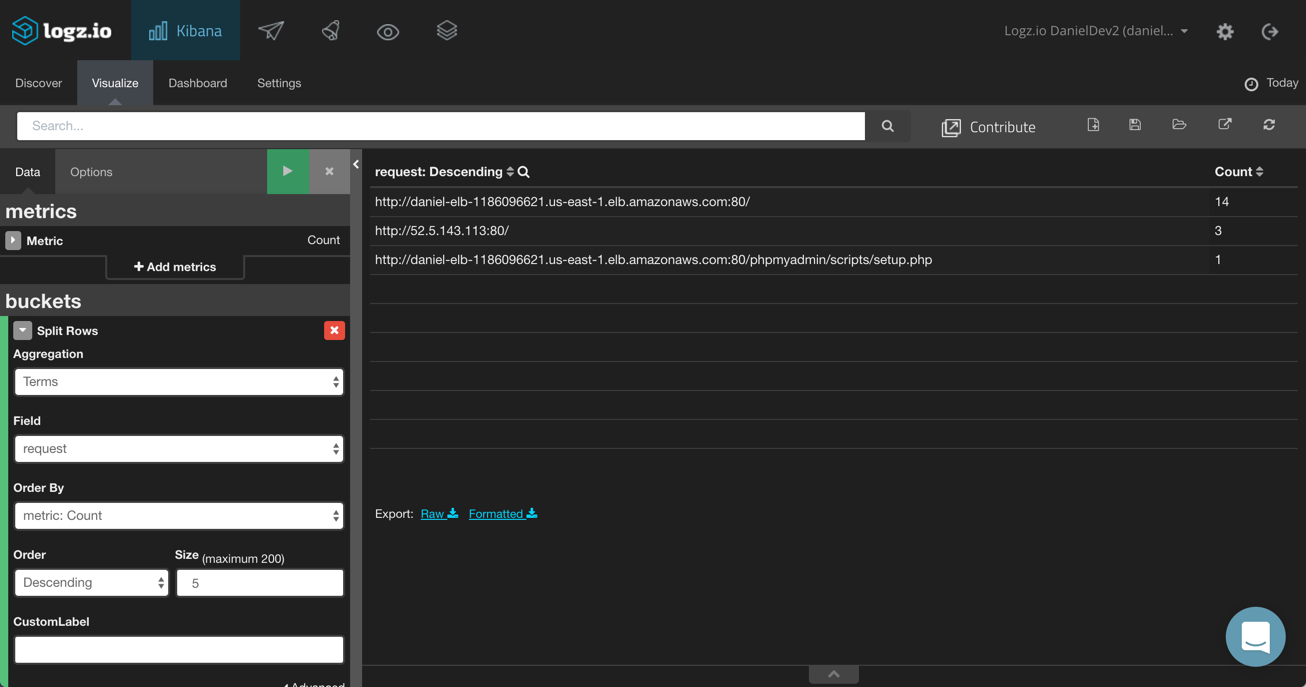
Requests breakdown
Using a Data Table visualization, you can see a list of all the requests (using the request field) that your load balancer is processing. You could also enhance this table further by adding the average processing time for both the requests and the responses.
Endnotes
Whether for statistical analysis, diagnostics, or troubleshooting — ELB logs are a valuable resource to have on your side. But it is being able to aggregate and analyze them with ELK that really allows you to benefit from the data.
The visualization examples above were simple demonstrations of how to analyze your ELB logs, but you can slice and dice the data in any way you want. By adding all these visualizations into one comprehensive dashboard, you can equip yourself with a very useful monitoring tool for your ELB instances.
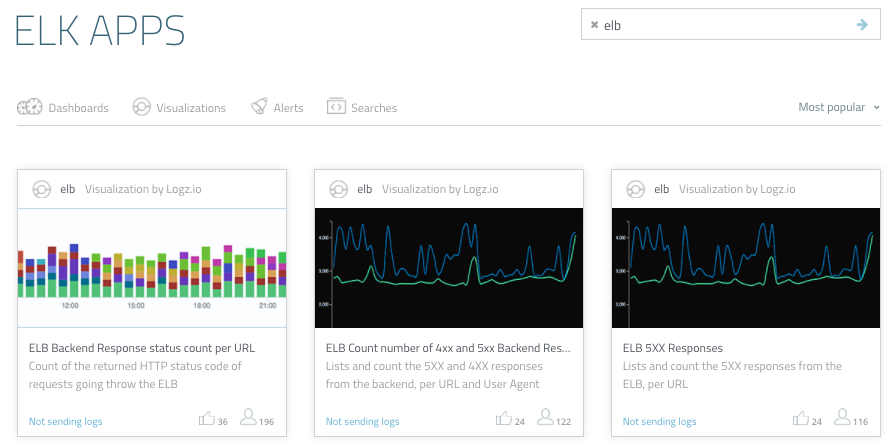
ELK Apps, Logz.io’s free library of pre-made KIbana visualizations and dashboards for many various log types, contains a number of ELB dashboards you can use to get started. Just open the page and search for “elb”:
Enjoy!

You Might Also Like

Cracking Production Performance Issues with Open Source Observability

