
Deploying a Kubernetes cluster with GKE
March 6, 2019
In an attempt to jump on the Kubernetes bandwagon, more and more managed Kubernetes services are being introduced. In a previous post, we explored how to deploy a Kubernetes cluster on Amazon EKS. This time, we will cover the steps for performing a similar process, this time on Google’s Kubernetes Engine.
What is Google Kubernetes Engine (GKE)?
Originally a Google-spawned project, it’s no surprise that Kubernetes is strongly intertwined and supported in the public cloud services provided by Google. In fact, Google was among the first public cloud providers to offer a fully managed Kubernetes service called the Google Kubernetes Engine, or GKE. More on the subject:
Similar to the other players in this field, GKE allows users to deploy Kubernetes without the need to install, manage and operate the clusters on their own, thus eliminating a key pain-point when running Kubernetes. It provides users with full control over cluster management and container orchestration, including load-balancing, networking as well as access to all Kubernetes features.
Users can run Kubernetes in a Google Cloud Platform-friendly environment, meaning they can reap the benefits of seamless integrations with other cloud tooling provided by Google such as Code Shell, Stackdriver, and more.
Step 0: Before you start
In this tutorial, I use the GCP console to create the Kubernetes cluster and Code Shell for connecting and interacting with it. You can, of course, do the same from your CLI, but this requires you have the following set up:
- Installed and configured gcloud
- Installed kubectl:
(gcloud components install kubectl)
Step 1: Create a new project
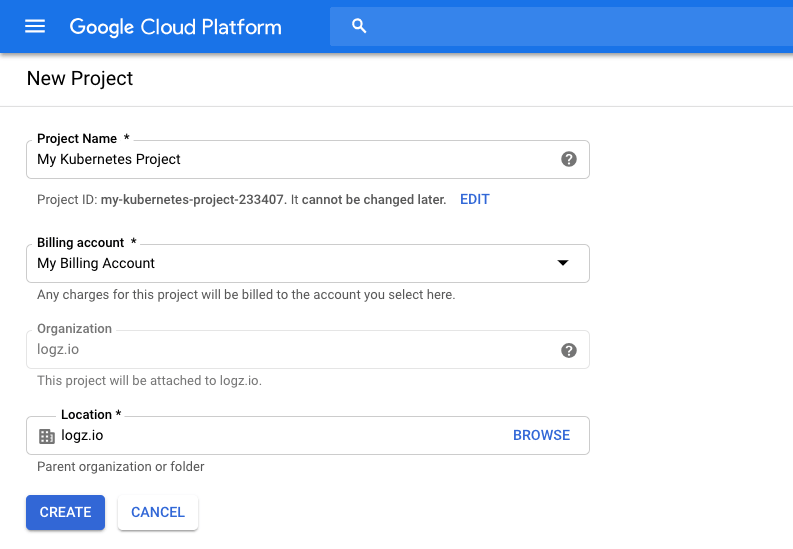
If you’re a newcomer to GCP, I recommend you start by creating a new project for your Kubernetes cluster — this will enable you to sandbox your resources more easily and safely.
In the console, simply click the project name in the menu bar at the top of the page, click New Project, and enter the details of the new project:
Step 2: Creating your cluster
We can now start the process for deploying our Kubernetes cluster. Open the Kubernetes Engine page in the console, and click the Create cluster button (the first time you access this page, the Kubernetes API will be enabled. This might take a minute or two):
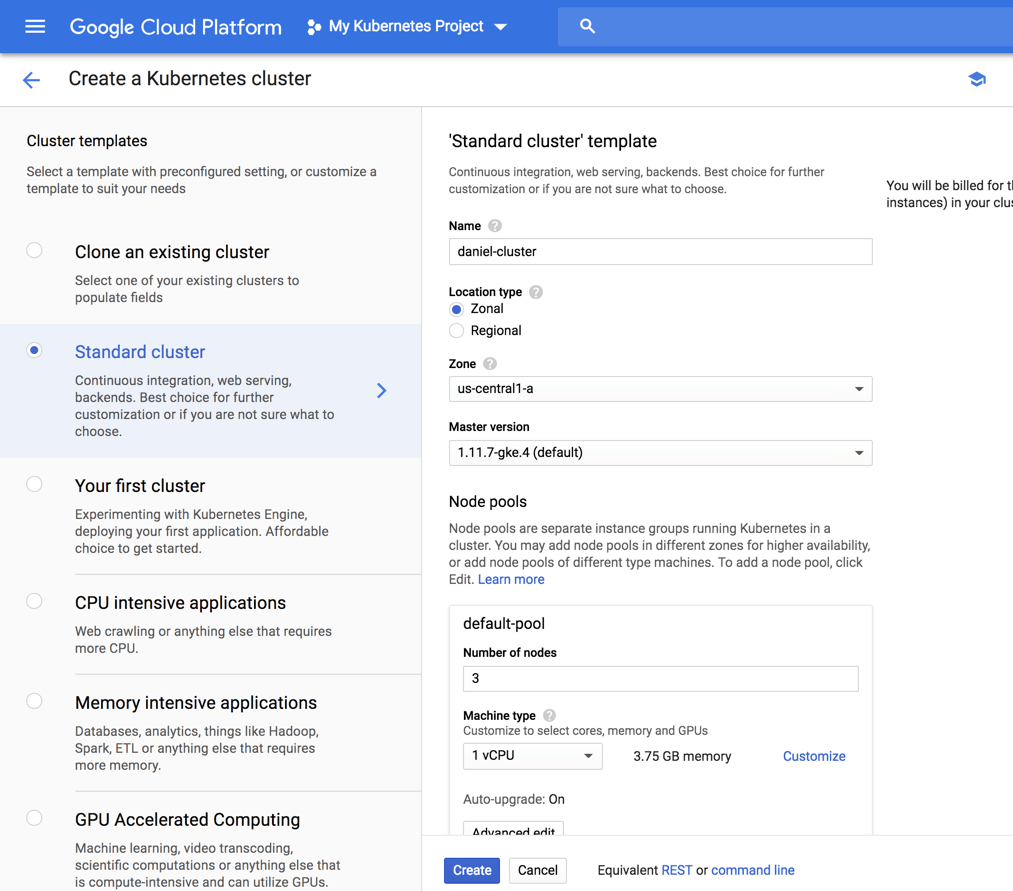
GKE offers a number of cluster templates you can use, but for this tutorial, we will make do with the template selected by default — a Standard cluster.
There a are a bunch of settings we need to configure:
- Name – a name for the cluster.
- Location type – you can decide whether to deploy the cluster to a GCP zone or region. Read up on the difference between regional and zonal resources here.
- Node pools (optional) – node pools are a subset of node instances within a cluster that all have the same configuration. You have the option to edit the number of nodes in the default pool or add a new node pool.
There are other advanced networking and security settings that can be configured here but you can use the default settings for now and click the Create button to deploy the cluster.
After a minute or two, your Kubernetes cluster is deployed and available for use.
Step 3: Use kubectl to Connect to the Cluster
Clicking the name of the cluster, we can see a lot of information about the deployment, including the Kubernetes version deployed, its endpoint, the size of the cluster and more. Conveniently, we can edit the deployment’s state.
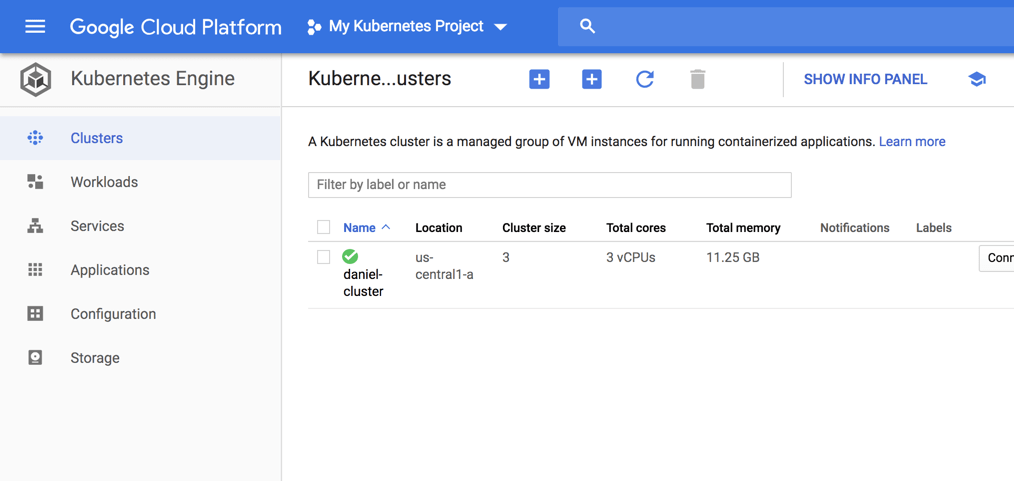
Conveniently, GKE provides you with various management dashboards that we can use to manage the different resources of our cluster, replacing the now deprecated Kubernetes dashboard:
- Clusters – displays cluster name, its size, total cores, total memory, node version, outstanding notifications, and more.
- Workloads – displays the different workloads deployed on the clusters, e.g. Deployments, StatefulSets, DaemonSets and Pods.
- Services – displays a project’s Service and Ingress resources
- Applications – displays your project’s Secret and ConfigMap resources.
- Configuration
- Storage – displays PersistentVolumeClaim and StorageClass resources associated with your clusters.
You will need to configure kubectl in order to connect to the cluster and thus to communicate with it. You can do this via your CLI or using GCP’s Cloud Shell. For the latter, simply click the Connect button on the right, and then the Run in Cloud Shell button. The command to connect to the cluster is already entered in Cloud Shell:
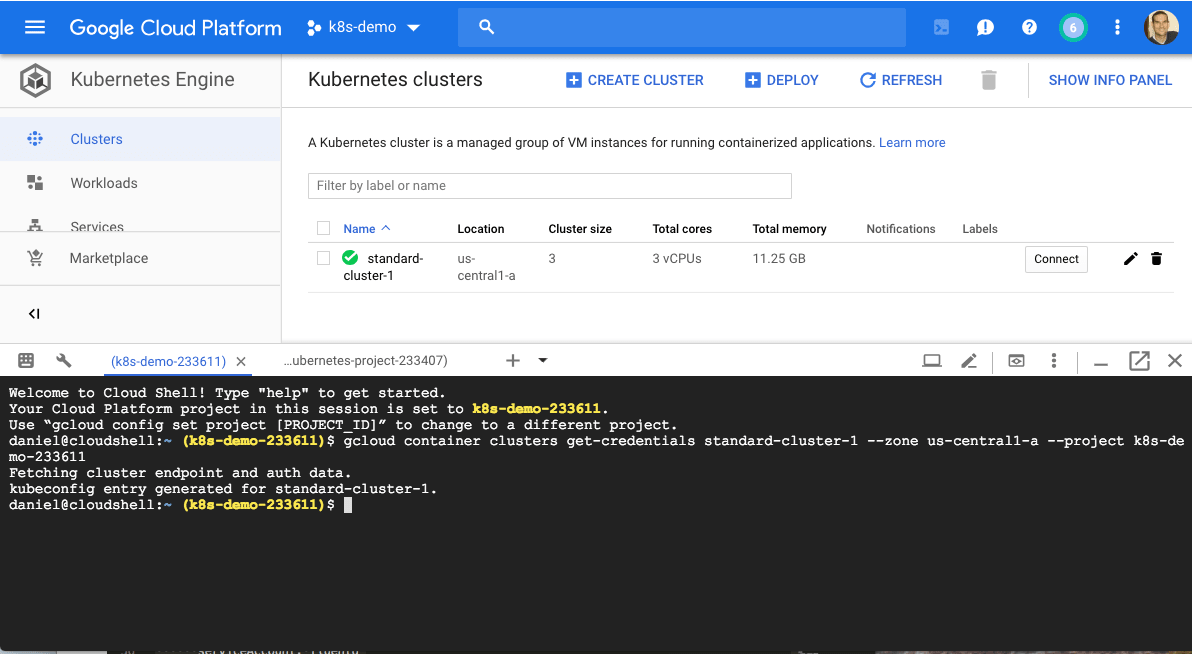
Hit Enter to connect. You should see this output:
Fetching cluster endpoint and auth data.
kubeconfig entry generated for daniel-cluster.
To test the connection, use:
kubectl get nodes

NAME                                                STATUS    ROLES     AGE       VERSION
gke-standard-cluster-1-default-pool-227dd1e4-4vrk   Ready     <none>    15m       v1.11.7-gke.4
gke-standard-cluster-1-default-pool-227dd1e4-k2k2   Ready     <none>    15m       v1.11.7-gke.4
gke-standard-cluster-1-default-pool-227dd1e4-k79k   Ready     <none>    15m       v1.11.7-gke.4
Step 4: Deploying a sample app
Our last step is to deploy a sample guestbook application on our Kubernetes cluster.
To do this, first clone the Kubernetes examples repository. Again, you can do this locally in your CLI or using GCP’s Cloud Shell:
git clone https://github.com/kubernetes/examples
Access the guestbook project:
cd examples/guestbook

ls

all-in-one                   legacy      README.md
redis-slavefrontend-deployment.yaml  MAINTENANCE.md
redis-master-deployment.yaml  redis-slave-deployment.yaml
frontend-service.yaml     php-redis       redis-master-service.yaml
redis-slave-service.yaml
The directory contains all the configuration files required to deploy the app — the Redis backend and the PHP frontend.
We’ll start by deploying our Redis master:
kubectl create -f redis-master-deployment.yaml
Then, the Redis master service:
kubectl create -f redis-master-service.yaml

kubectl get svc

NAME           TYPE        CLUSTER-IP      EXTERNAL-IP   PORT(S)    AGE
kubernetes     ClusterIP   10.47.240.1     <none>        443/TCP    1h
redis-master   ClusterIP   10.47.245.252   <none>        6379/TCP   43s
To add high availability into the mix, we’re going to add two Redis worker replicas:
kubectl create -f redis-slave-deployment.yaml
Our application needs to communicate to the Redis workers to be able to read data, so to make the Redis workers discoverable we need to set up a Service:
kubectl create -f redis-slave-service.yaml
We’re not ready to deploy the guestbook’s frontend, written in PHP.
kubectl create -f frontend-deployment.yaml
Before we create the service, we’re going to define type:LoadBalancer in the service configuration file:
sed -i -e 's/NodePort/LoadBalancer/g' frontend-service.yaml
To create the service, use:
kubectl create -f frontend-service.yaml
Reviewing our services, we can see an external IP for our frontend service:
kubectl get svc

NAME           TYPE           CLUSTER-IP      EXTERNAL-IP     PORT(S)        AGE
frontend       LoadBalancer   10.47.255.112   35.193.66.204   80:30889/TCP   57s
kubernetes     ClusterIP      10.47.240.1     <none>          443/TCP        1h
redis-master   ClusterIP      10.47.245.252   <none>          6379/TCP       13m
redis-slave    ClusterIP      10.47.253.50    <none>          6379/TCP       6m
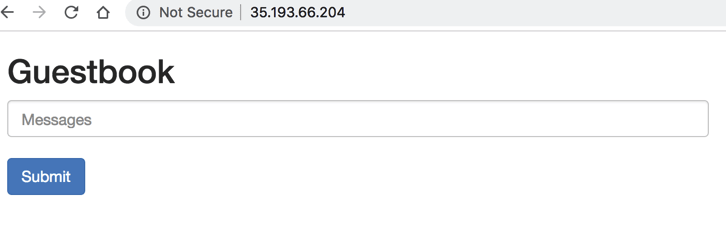
Congratulations! You’ve deployed a multi-tiered application on a Kubernetes cluster!
What next?
This was a very basic deployment using a simple example application. In larger production deployments, there are many more considerations that you will need to take into account — security, networking and of course — monitoring and troubleshooting.
In a future article, we’ll show how to add the ELK Stack and Logz.io into the mix to help you gain visibility into your Kubernetes deployments on GKE.

You Might Also Like

Announcing Logz.io Open 360™: One Platform for Open Source Observability

